Contents
- 1 Testing introduction & quick guide
- 2 Database generation (Testbed)
- 3 Performance testing
- 4 Functional testing
Testing introduction & quick guide
Introduction
Testing tools for Cyclos have been made available for download
There are two main areas for testing. Firstly the functional tests. These tests can run 'test suites' that will check if the functionalty is working correctly (for example insert an advertisement or making a payment). Functional test are always run by the development team after any code change to make sure nothing has been broken. And secondly performance tests. These tests will test the system load of the main Web or Web services interfaces under various conditions. There are different test approaches to test the performance. For example testing the 'maximum throughput' (e.g. how many payments the system can process at once) or testing a functional flow (per user) within a specific period. This type of test can be used for example to find out the average response time for 1000 concurrent users performing each a sequence of specific actions (e.g. login, update profile, search members, making payment, logout) within a period of 10 seconds.
The test tools also include a script to generate test databases (Jmeter).
Quick guide for functional testing
Web tests
- Download testbed bundle and extract files in a suitable location.
- Install and configure Selenium IDE
- Configure Cyclos to startup with the database created in the installation section (cyclos.properties)
- Startup Cyclos
- Open Selenium IDE and load the testsuite cyclos3_testbed_X.X/selenium/tests/GeneratedTestSuite.html
- Run all tests from the Selenium IDE.
Web service tests
- Download testbed bundle and extract files in a suitable location
- Install SoapUI
- Create a database using the script in the folder: cyclos3_testbed_X.X/soapui/db
- Configure Cyclos to use the database (cyclos.properties)
- Startup Cyclos
- Load the project cyclos3_testbed_X.X/soapui/Cyclos_3_6-WS_Tests.xml
- Run the tests
Quick guide for performance testing
- Download testbed bundle and extract files in a suitable location.
- Install JMeter
- Configure JMeter test plan
- Configure Cyclos
- Generate the database using testbed tool
- Run the tests
- Generate a statistic report
Database generation (Testbed)
The testbed is an utility to generate a database with sample data, specially member profiles, advertisements and payments.
There is a project called "cyclos_testbed" (available for Cyclos3.6.x) that can be used to generate a database with members, advertisements and payments and images. There are various options/settings to create the database.
The testbed project also include a series of scripts that can be used with Jakarta JMeter to perform load tests on cyclos.
Configuration
The configuration is done in 2 distinct files:
- cyclos.properties:
Works just like the regular cyclos.properties in the main Cyclos application. What will really be used here is the database connection configuration. Normally, only the hibernate.connection.url property should be changed, to adapt to the MySQL database name. If your database uses a distinct username and password, make sure to adjust the hibernate.connection.username and hibernate.connection.password properties as well.
- cyclos-testbed.properties:
This file defines what will be generated. The file is self-commented. You can define how many members will be generated, how many advertisements will they have and how many payments they will do to other members. The database will replaced an existing database. However, there's the option to generate more data in an existing database. If you want this, make sure the internal identifiers for the groups in which members will be generated (a comma separated list may be used - when more than one, the specified number of members will be by group) and the internal identifier for the accounts used are all correct. Another thing that can be changed is the images which will be used for members and ads. You can replace the images/*.gif files.
Be aware that databases with many images will increment the database size considerable. Large databases can take some time to create. A database with 100.000 users and additional data (see cyclos-testbed.properties) took 24 hours to create on an average normal PC.
Creating the database (by running the utility)
Run ./testbed (from the cyclos3_testbed_X.X/sh folder on Linux) or testbed.bat (from the cyclos3_testbed_X.X/bat folder on Windows). Java 6+ is required. To check this, you can run java -version
Performance testing
Web and web service load tests
Introduction
Load tests have been executed to measure the Cluster performance under different hardware configurations. To deliver hi load to the servers simulating multiple users and collect the needed statistics we used JMeter. Payment is one of the most important core functionalities of the system and was selected first to be measured in a cluster environment. Basically, we created a test case that consists on a single test step that performs a payment between two members. This test case is run concurrently and the main statistics are gathered to conform a summary report. The following results are real but they are still far from being optimal and not intended to give an estimate of the overall performance of the system.
Hardware configuration
| Processor | Memory | Ethernet Card | Task |
| Intel(R) Core(TM) i3 CPU 550 @ 3.20GHz | 4GB | Gigabit | MySQL Server Distrib 5.1.58 |
| Intel(R) Core(TM) i3 CPU 550 @ 3.20GHz | 4GB | Gigabit | SoapUI client 4.0.1 |
| Intel(R) Pentium(R) Dual CPU E2140 @ 1.60GHz | 3GB | Gigabit | Tomcat 6.0.26 worker 1 and Apache load balancer |
| Intel(R) Pentium(R) Dual CPU E2140 @ 1.60GHz | 3GB | Gigabit | Tomcat 6.0.26 worker 2 |
| Intel(R) Pentium(R) Dual CPU E2140 @ 1.60GHz | 3GB | Gigabit | Tomcat 6.0.26 worker 3 |
| Intel(R) Pentium(R) Dual CPU E2140 @ 1.60GHz | 3GB | Gigabit | Tomcat 6.0.26 worker 4 |
- MySQL and tomcat nodes are connected to a gigabit switch.
- JMeter node is connected by a 100Mb/s Ethernet cable to a tomcat node were the load balancer is.
Software configuration
The load tests can be run with or without a cluster environment. Follow this link to see how a cluster environment is configured. In the following sections you'll find some tuning steps to gain some performance.
JMeter
JMeter 2.5.1 was used configured with 1.5 GB of maximum available memory, issuing requests to the Apache load balancer node.
JMeter installation
- Download jakarta-jmeter from the download center. The tests were executed with version 2.5.1. So supose we have the installation directory in /opt/develop/jakarta-jmeter-2.5.1
- Go to the plugins page and download the file JMeterPlugins-0.5.1.zip.
Inside this zip there is a file called JMeterPlugins.jar that must be placed in the /opt/develop/jakarta-jmeter-2.5.1/lib/ext folder.
- Copy the exporter plugin cyclos3_testbed_X.X/jmeter/plugin/statsExporter.jar to the /opt/develop/jakarta-jmeter-2.5.1/lib/ext folder
JMeter test plan configuration
- Open JMeter
- Open the Cyclos3_Load_Tests.jmx project located in the jmeter folder (cyclos3_testbed/src/nl/strohalm/cyclos/testbed/jmeter).
- Select one of the thread groups to run and disable all the other ones. To disable a thread group right click the thread group and select Disable option.
- Click on the enabled thread group and input the necessary information. The exporter plugin (until now) is only thought for very restricted thread plans.
The following fields should be in cero:
"First, wait for", "using ramp-up", "Finally, stop", "threads every".

The following fields should contain equal values:
"threads every", "Then hold load for".
- Expand the enabled thread group and click on the Load Test Stats Exporter component. You should see a field for a request label, an output path and a table.
In the request label you can input the exact name of a request to tell the plugin to also export specific statistics for that particular request. In the output path you must introduce the output path for the folder were all statistic logs will be saved and afterwards used by the report generator.
- Ensure the server and port information is correctly set.
MySQL
The default my.cnf was used with the following tuning:
thread_cache_size                    = 23
max_connections                      = 2800
table_cache                          = 1000
innodb_buffer_pool_size              = 2048M
innodb_additional_mem_pool_size      = 32M
innodb_thread_concurrency            = 8
key_buffer            		     = 28M
A good rule to follow to assign mysql maximum number of connections is: Tomcat maxThreads * 2 * Number of tomcat nodes.
Database
Generate a database using the testbed tool, read this section to learn how to do it. Make sure that the database is generated using the following rules.
- Member usernames: memberX, with X = {1,2..N}
- Member passwords: 1234
- All this members should belong to the Full Members group.
- All members need to have an account in Members Account with big amount of money.
Here is an example of cyclos-testbed.properties that can be used to generate the database following the rules.

cyclos.testbed.membersBufferSize = 50
cyclos.testbed.members = 1000
cyclos.testbed.imagesPerMember = 0
cyclos.testbed.adsPerMember = 0
cyclos.testbed.imagesPerAd = 0
cyclos.testbed.transactionsPerMember = 1 / 2
cyclos.testbed.transactionAmount = 10 / 100
cyclos.testbed.creditLimit = 0
cyclos.testbed.initialCredit = 1000000
cyclos.testbed.loginPassword=1234
cyclos.testbed.transactionPassword=ABCD
cyclos.testbed.createDatabase=true
cyclos.testbed.groupIds=5
cyclos.testbed.debitAccountIds=1
cyclos.testbed.memberAccountTypeIds=5
cyclos.testbed.transferTypeId=13
cyclos.testbed.adCategories=
Linux O.S.
Be sure that the maximum number of open files per user is large enough. In our case, the default (1024) value had to be duplicated. To know how this is configured see the problems and solutions section.
Apache Tomcat and Apache load balancer
- Apache Tomcat 7.0.26
- Apache 2.2.16
The load balancer was configured to accept a maximum of 350 simultaneous connections. Keep in mind that the maximum number of connections configured in the load balancer shouldn't be lower than the maximum number of connections that each tomcat accepts. So, each tomcat was configured to accept up to 350 simultaneous connections. Follow this link if you want more information on how to configure tomcat and load balancer connections.
- Maximum number of connections in tomcat (server.xml) AJP connector:
<Connector port="8009" protocol="AJP/1.3" maxThreads="450" />
- Maximum number of connections in load balancer (apache2.conf). Assign this value in the appropriate modules:
MaxClients 400
- Adjust some values of cluster configuration (server.xml):
<Membership className="org.apache.catalina.tribes.membership.McastService"
	...
        frequency="1000"
        dropTime="30000"/>

<Receiver className="org.apache.catalina.tribes.transport.nio.NioReceiver"
	...
	selectorTimeout="1000"

<Sender className="org.apache.catalina.tribes.transport.ReplicationTransmitter">
        <Transport className="org.apache.catalina.tribes.transport.nio.PooledParallelSender" timeout="10000"/>
Cyclos
In cyclos.properties: Assign the maximum number of connections to the database for each cyclos node. A good value would be twice the maximum number of threads configured in tomcat connector.
hibernate.c3p0.minPoolSize      = 50
hibernate.c3p0.maxPoolSize      = 700
hibernate.c3p0.acquireIncrement = 20
Once the database is generated (see #Database section):

* Turning off all logs in Cyclos (to get the best performance).
  Log in as an admin and go to Settings > Log Settings and select Off in all logs. Logs can lead to poor performance.

* Adding a new channel:
	Menu Settings > Channels
	  New channel:
		Introduce the following information:
		* Display name: Web service channel
		* Internal name: Web service channel
		* User identification: Login name
		* Default user identification: Login name
		* Credentials: Login password
		* Supports payment request: unchecked
		* Submit the form and write down the channel id by looking at the current url, we'll suppose: channelId=7

* Adding the channel to the transfer type:
	Menu Accounts > Manage Accounts
	  Modify Member account
		  Modify External trade transfer
			 * Check the Web service channel option in Channels
			 * Leave the Max amount per day empty
			 * Write down the transfer type id by looking at the URL in your browser. It should say something like this: transferTypeId=30.
			 * Submit the form.

* Adding an unrestricted web service client:
	Menu Settings > Web service clients
	  New web service client:
		Introduce the following information:
		* Name: Unrestricted web service client
		* Internet address: 192.168.0.1 (jmeter's IP)
		* Channel: Web service channel
		* Credentials required: checked
		* Permissions
			# Perform payments:
				Check External trade transfer option
		* Submit the form

* Adding the channel to the accessible channels of the member's group:
	Menu Users & Groups > Permission Groups
	  Modify Full members
		* Click on change button
		* In Access settings section, in Accessible channels select Web service channel option.
		* Submit the form

* Enabling Web service channel to all members:
	In some steps above you wrote down the channel id, if it differs from 7 change the id on the following statement and execute it using MySQL command line or your favorite tool.

	insert into members_channels(member_id, channel_id) select id, 7 from members where subclass = 'M';

* Change Member1 notification preferences (this configuration will avoid bottlenecks in load tests were everybody pays to him, N -> 1):
	Logged in as Admin, go to Home and search for member1. Go to it's profile and under Preferences:
	* Click on Submit button for Manage Notifications.
	* Click on Change button.
	* Uncheck Payment events
	* Uncheck Payments made via external channels.
	* Submit the form.
Results
Running the tests
- Startup Apache
- Startup Cyclos servers
- If you have already run the test Select Run > Clear All from the menu. This will clear all results, reset counters and decide the name of the new folder to store the statistic results. This folder will be named with the current date expressed in milliseconds.
- Select Run > Start from the JMeter's main menu.
Generating a report
There is a tool that gathers all the exported data (by the exporter plugin) and creates a report with some basic statistics. After running the tests follow the next instructions to get the generated report.
- In the cyclos3_testbed_X.X directory, there are report property files for different types of tests. For example, if a web service load test is done (using the Cyclos3_Load_Tests.jmx project, configure the ws_report.properties and execute the report generator with this file. To do this, follow the next instructions:
- Run the script (loadTestReport on Linux) or (loadTestReport.bat on Windows) passing the path to the report properties file.
 e.g:
 sh loadTestReport ws_report.properties
If no properties file path is passed to the script, it assumes the properties file is called report.properties and is located in the cyclos3_testbed_X.X directory.
Web services results
Follow this link to download a pdf with the web service results.
Some important information about results:
When tests were carried to the maximum load
- CPU of tomcat nodes was over 70% constantly.
- Memory of tomcat nodes was below 50%.
- CPU of MySQL node augmented near 20% for each tomcat node in the cluster, reaching almost 90% with 4 tomcat servers.
- Memory of MySQL node was far from reaching the maximum.
- The network interface with larger load was MySQL reaching 10% of utilization.
Web results
Follow this link to download a pdf with the web results.
Problems and solutions
- java.net.SocketException: Too many open files
To increase the maximum number of open files follow this article
Previous Work
Configuring and running the JMeter project
Inside JMeter, open the file cyclos3_testbed_X.X/jmeter/Cyclos3.jmx. It contains a script with the following steps:
- login
- home page
- view account information
- search ads
- search members
- view a member profile
- make a payment
- logout
Each of those steps involves one or more requests, but are organized in groups, so they can be easily disabled if needed. The basic instructions to make it work is:
- In the Thread Group configuration, set the Number of Threads (users) and the ramp-up period, which is the time taken to start all threads.
- In the HTTP Request Defaults, set the server name and path
- Depending on your database, adjust the following files:
- members_to_login.csv: contains 2 columns, the username and password of users which will login. You can issue the following select statement in the database to check that out: select username, password from users; When the number of users in the Thread Group is greater than the number of users which will login, it means that the same user can have more than one session in different threads.
- members_to_view_profile.csv: This is a file with one single column, containing the internal identifier of users which will have their profiles viewed and will receive payments. Make sure the identifiers are distinct from the members which will login, as an error will happen if a logged user tries to perform a payment to himself. To see the available ids / users, run the following query in your database: select id, username from users;
- Adjust the Uniform Random Timer, which will add a delay between requests of the same user. This is a bit more realistic than no delay, as in production an user usually stays for a few seconds on each page before navigating to the next one. However, the throughput is reduced, as less requests are generated. For a very heavy load test, you can disable the timer.
- You are ready to run! A nice thing to do is set the Thread Group to have 1 single user on the first run, as the server has several initializations to perform. After setting it, click the Summary Report and click the menu Run > Start. You shall see each request done. Then you can run a nice test. Adjust the Thread Group again to a higher number (like 50), navigate to the Summary Report again, Run > Clear and Run > Run again.
Fine tuning Cyclos
The performance obtained heavily depends on several configuration variables. First of all, it's recommended to run the JMeter tests from a different machine than the Cyclos server itself, as JMeter is resource heavy and it can slow down Cyclos. Then, here are some aspects which can be tuned (please, note that when the cyclos.properties file is mentioned, it's the server one which is in WEB-INF/classes directory, not the one included in testbed):
- Hibernate 2nd level cache: In the cyclos.properties, ensure that
hibernate.cache.use_second_level_cache are set to true. This will reduce the database roundtrips.
- Connection pool size: hibernate.c3p0.maxPoolSize contains the maximum open database connections at a time. Each request uses a database connection, so it's not practical to have 300 users at a time with a connection pool limited to 10 connections. But it's also not necessary to set to the exact size of the maximum expected users, as there's a delay between the request and connection (specially if the Timer is enabled). Make sure that the pool size is a bit larger than the cyclos.maxRequests property.
- MySQL tuning: There are plenty of options to tune MySQL. Cyclos uses InnoDB tables, so http://dev.mysql.com/doc/refman/5.0/en/innodb-tuning.html can help. Some practical tips are to use a query cache and to raise the innodb_buffer_pool_size.
- Topology: Having the database in a separate machine as the web server can make the system more scalable. However, for lower loads, and if the CPU performs well (specially multi-core), the network time can be larger than the time taken to process everything, which will lead to worst response times. The ideal topology would be: clients (JMeter) in a network connecting the web server and another (ideally gigabit) network connection between the web and the database servers. Also, to a better simulation of a production environment, and to have the best results, make sure that the machines running the web and database servers are not running a GUI environment.
Load test results
It is hard to give any numbers because the load depends very much on how Cyclos is accessed. For example, the Web access channel demands much more resource than SMS operations.
Also the hardware is very important. The main factors are
- CPU:
- Memory:
- Network: Gigabit network cards and switches, use crossover cables where possible
Computers used in testing
- 5 CPU’s: Pentium dual core serie 5000 (3 - 4 years old), every one with 4 Gb Memory
- Network: Gibabit
Setup
1 computer running JMeter (http requests)
3 computers running Tomcat / Cyclos
1 computer running MySQL
Results
See picture at the right:
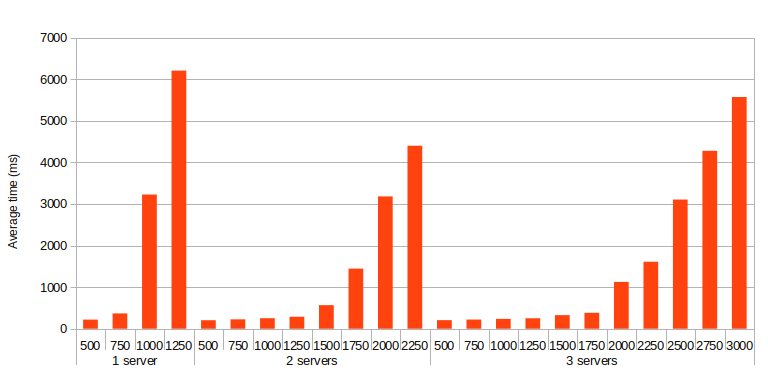
The tests where done with 500 to 3000 members loging in performing a payment and login out in 10 seconds (per user). Using one tomcat server the response time where good up to 750 users. With three Tomcats 2500 users still gave reasonable results (3 seconds). Be ware that relatively old computers where used. Using a single computer/server with a more modern chips will perform considerably better.
There are a collection of functional tests that are run to ensure a minimal behavior of the application. This section describes how to install the required environment and the steps needed to run and extend this tests. There are two approaches, the Selenium environment is used to test core functionality surfing Cyclos web front end from a browser; the second approach (using SoapUI) is to test core functionality that is exposed through web services.
Functional testing
Selenium Environment
Installation
- Selenium scripts might not work for early versions of Firefox. It works fine with Firefox 11 and Selenium IDE 1.8.
- Open firefox and go to the following URL: http://seleniumhq.org/download/ to install the plugin.
- It is also important to have the Firebug plugin, you can install it from within firefox.
- Optionally, to run the tests that have already been created, install the database located in cyclos3_testbed_X.X/selenium/db folder and change the cyclos.properties file of your cyclos installation to point to this database.
- Add the user extensions to the Selenium IDE. To do this, open the Selenium IDE (Firefox: Tools > Selenium IDE), Options > Options ..., add the path to the user-extensions.js file cyclos3_testbed_X.X/selenium/user-extensions.js in the Selenium Core Extensions section.
- Install the MKP- Selenium IDE tools (that installs a set of useful selenium ide plugins). If the MKP-Selenium IDE tools is not available for your Firefox, try installing the individual plugins: Stored Variables Viewer (Selenium IDE) and Selenium IDE - Sel Blocks.
Links
- Selenium reference: http://seleniumhq.org/docs/index.html
- Command reference: http://seleniumhq.org/docs/02_selenium_ide.html#selenium-commands-selenese
- Locator reference: http://seleniumhq.org/docs/02_selenium_ide.html#locating-elements
- XPath tutorial: http://zvon.org/xxl/XPathTutorial/General/examples.html
The basics
Selenium IDE
Open the Selenium IDE: In Firefox, Tools > Selenium IDE.
- Left Panel
By default, Selenium starts with a Test Suite containing a unique Test Case named 'Untitled'. You can create new test cases through the top menu or the context menu of the left panel.
- Right Panel
At the right panel Selenium displays the content of the selected test case. To select a test case you must double click the test case, otherwise the test case will be highlighted and the content of the test case won't appear at the right panel. The right panel contains two tabs, Table and Source. The Table tab (when it is enabled) displays the list of commands to be executed by the browser. The Source tab displays the list of commands in the selected format. By default, the selected format is HTML. You can switch between different formats through the Options menu. Note that the Table tab will be enabled only when the HTML format is selected.
- Base URL
At the top of the IDE, there is a text box which you need to fill with a base URL (e.g: http://localhost:8080/cyclos/do/). Certain commands need an URL as an argument. The URL will be relative to the base URL. e.g:
    Command      Target
    open         login        (login is the relative path, the absolute URL would be: http://localhost:8080/cyclos/do/login).
The base URL is specific to each test case and it's not global to all the test cases. Modifying the base URL located at the top will modify only the selected test case's base URL.
- Recording browser events
To start recording click on the recording button (red bullet) and start browsing. After a few actions with the browser click again on the recording button and look at the commands that have been detected.
That's it!. To replay your actions click on the green play button (there are two, one to replay the entire test suite and other to replay the selected test case).
- Saving test suites and test cases.
Once the test case is finished it can be saved to a file through the menu or the context menu over the test case. A test suite only contains references to test case files. Saving a test suite prompts the user to save every unsaved test case, and after all, prompts to save the test suite file.
Not everything is so easy
Sometimes Selenium IDE doesn't catch all the actions done in the browser and some commands have to be added manually in order to create a complete test case. To do this, open the Table tab and add them in the places you need, helped by the context menu.
Selenium can't handle alerts that rise in the onLoad event of a page. If this happens, the test gets stucked waiting for something to "consume" the alert. In Cyclos this alerts are everywhere, the workaround is to change the javascript function showMessage (head.jsp) so that a div is displayed instead of an alert. Yes, your Cyclos must be patched.
   function showMessage() {
       ...
       if(booleanValue(readCookie("showMessage"))) {
           alert('${message}');        -----> this line has to be changed by: showMessageDiv('${message}');
           messageDiv = null;          -----> this line should be added.
       }
       deleteCookie("showMessage");
       ...
   }
Locators
Many commands need to refere to an element in the page. The reference is done giving a locator. For example: the click command needs to be done on some element. To write the locator it is very useful to inspect the element you want to locate. To inspect the element, right click the element in the browser and choose inspect element (firebug must be installed first). Locators are ways of locating an element in the page. For example you could locate an element giving an XPATH: (//input[@id='username']). Click on the left panel examples to learn basic XPATH constructions in this tutorial: http://zvon.org/xxl/XPathTutorial/General/examples.html There are serveral other ways to locate an element, someones much more easier. They are all explained here: http://seleniumhq.org/docs/02_selenium_ide.html#locating-elements. Reeding this reference is a must!.
Tips & tricks
- Execute a single command in the Selenium IDE by double clicking the command row.
- Use the find button on the command tab to verify if the written locator is correct. If it is, the element in the browser will be highlighted; if it's not, an error will be notified in the log tab of the selenium ide.
- Use the context menu on the browser over an element to add commands related to that element directly to the Selenium IDE. For example, you could select some text in the browser and add an assert to that text through the context menu.
- *AndWait: All the commands that ends with AndWait tells selenium to wait for a page to load after the action is done. For example, clickAndWait when submitting a form. If you only use click command, the test will continue without waiting for the page to load and surely your test will fail.
- typeKeys, waitForValue: There are many pages that uses an input element where the user starts typing the code of something and the system autocompletes that element and loads the name in another input element. It is useful the typeKeys and waitForValue commands for this cases. The typeKeys is different from the type command. The typeKeys is exactly what a user does. However, the type command is faster and almost always work as it's expected. The waitForValue tells Selenium that it has to wait for some value in some element. To be more specific: if the input component hears key events to do something, use typeKeys. Otherwise, you could use type. Note that in some versions of Firefox, a direct call of typeKeys over an element doesn't work. To ensure the correct behavior insert a focus command before the typeKeys to gain the focus of the element.
- assertTextPresent: Asserts a text in the whole page.
- assertValue: Asserts an element value.
- select: Use select command for combo boxes instead of simulating the select with clicks.
    Command      Target       Value
    select       age          label=30
- storeValue: Use the store commands to save in memory particular values that can be referenced in the following commands. For example, when a new ad is created, the page contains in a hidden input element (look at the page source code) the ad's id given by the system. Store this value to locate further in the list of ads which remove button you must click to remove the recently created ad.
- You can execute javascript within commands (using javascript{<javascript expression>}) or by the runScript command. There is also a shortcut to embed a variable value within a command expression, this is done using the ${<variableName>} expression.
    Command      Target
    clickAndWait //img[@class='remove' and @id=${adId}]
- runScript: Rich text editors can't be handled by selenium directly but you can manage it by accessing the components API with javascript. For example, the description of an ad is introduced in a rich text editor. The following command writes in the component.
    Command      Target
    runScript    FCKeditorAPI.GetInstance( 'descriptionText' ).SetHTML( 'The new ad description' )
- storeEval: Use this command to store in a variable the result of a javascript expression. Example: If you type 'albert' as the username when creating a member, in the next execution the test will fail cause there is another member with the same username. You need to put something that is generated each time you execute the test.
    The solution is to create a variable with the long representation of the actual date. This will be unique each time you execute it.

    Command      Target                  Value
    storeEval    new Date().getTime()    varUsername
    type         username                member${varUsername}     this will produce user names like: member126436363543
Custom Commands
This commands doesn't come as built-in commands, they are part of our own command set and are implemented in the user-extensions.js file.
- storeURLParameterValue: It's aim is to store a parameter value extracted from the actual URL. Generally, when a form is submitted, a new page is loaded and the id of the saved element appears as a parameter of the URL. In this cases the command becomes useful.
    Command                   Target                Value
    storeURLParameterValue    parameterName         variableName
- storeActualDate: This command stores in a variable the actual date in the locale format.
    Command                   Target
    storeActualDate           variableName
- storeTestCaseFolderPath: This command stores in a variable the absolute path of the folder where the current test case is stored.
    Command                   Target
    storeTestCaseFolderPath   variableName
- login: This command logs in an user. It's assumed that the user being logged in has 1234 as password. Takes two arguments: user and member. In case of administrators and members only the user is used. In case of operators, the member is used as the operator's owner.
    Command      Target                  Value
    login        admin
    login        member1
    login        operator1               member1
Note: If you want to export test cases that have custom commands to a certain language like java, the appropriate implementation for this language must be added, but for now this explanation is beyond the scope.
Test standards
- Cyclos should be switched to English language before recording your tests. It's very common to assert text after an action, the text should be always in English. The best would be to make assertions on elements and not on text. Text is more prone to change than element names for example.
- Write comments (option in the command context menu) so that the commands get tighted in explained sections. Probably, this comments will be extracted automatically by a tool to create a doc test reference. Think that the comments should say exactly what the test does.
- Write tests that can be executed any number of times. The tests should be smart enough to test that the functionality is correct and that a new run of the same test needs not to be run on a "reverted" database. For example, if the test asserts the text present "The ad with id 7 was created successfully", it won't succeed the next time it runs because the system will give id 8 to the new ad. You could assert some part of the text helped by regular expressions.
- Try to make simple command arguments. Sometimes when recording, Selenium creates commands with locators that are unreadable or more prone to brake with a little change in the structure of the page.
e.g:
   Command                   Target
   assertElementPresent      css=table.defaultTable > tbody > tr:nth(10) > td:nth(1) > span.customFieldContainer > input[name=member(customValues).value]
   Inspecting the element you'll find that the locator can be much more simple, it only takes a few seconds more and you'll make your tests more maintainable.
   The above example could be easily changed by the following command:

   Command                   Target
   assertElementPresent      //input[@fieldname='city']
- If the test case needs to open a certain page, don't record the clicks you do over the menu to open it. Instead use the open command with the direct URL. If Selenium records the clicked elements done in the menu, probably it will locate the menu items by it's position on the menu, and we all know that the items in the menu vary depending on the configuration.
The login example
- Go to the browser and open the Cyclos login page (e.g: http://localhost:8080/cyclos/do/login)
- Create a new test case.
- Start recording
- Go to the browser and type the login, password and submit the form.
- The following commands should be added automatically:
   command         target                value
   open            /cyclos/do/login
   type            cyclosUsername        admin
   type            cyclosPassword        1234
   clickAndWait    css=input.button
Sometimes the autocomplete of the browser interferes with the recording and the type cyclosPassword command could have been skipped. Manually insert the command right clicking in the commands window and choosing the appropriate option.
Created tests
There are many tests that have already been created, they can give you an idea of how to do some other things not covered in this introduction. There is a tool (jar) that can collect all the test cases from a folder and it's subfolders and make a single test suite to run them all. This jar is called testSuiteGenerator.jar and is located under the tests folder. It is also frequently used to change the URL of the test case scripts. Execute: java -jar testSuiteGenerator.jar -help from a command line in the cyclos3_testbed_X.X/selenium/tests folder to see all the generator options. The test cases are proven to be successful with the database located in the db folder.
User extensions
To add new commands append the implementations in the user-extensions.js file. Some considerations:
- the name of the function needs to follow this structure:
   Selenium.prototype.do<NameOfTheCommand> = function([firstArgument[, secondArgument]]){
       //implementation goes here
   };
- when a change to the user-extensions.js file is done you must restart Selenium IDE for the changes to take effect.
- You can have multiple javascript extensions. Just add them separated by commas.
SoapUI Environment
Installation
SoapUI is an open source functional testing tool. To download and learn SoapUI follow this link: http://www.soapui.org/
Introduction
SoapUI by itself doesn't provide the easiest way for us to create web service tests, but offers all the necessary tools for us to do it. So part of this document describes how to write web service tests in a simple way just using an OpenOffice Calc spreadsheet and generating a file that consists on the input that SoapUI takes to generate and run the tests. When designing this tool we focus directly on the target of what we wanted, and that was to specify tests that:
- are easy and fast to implement
- are easy to maintain
- can be run any number of times without having to restore the database
- are easy to run
In essence, we need to fill input values of a request, execute the request, make some assertions on the response and probably get some data from the response to be used in other requests.
Specifying tests
As we mentioned in the introduction a spreadsheet is used to write tests. In this section you'll learn how to specify a web service test in the spreadsheet and generate the properties file that SoapUI needs.
generator.properties file
Global configuration is established in the generator.properties file:
- ts.execution is a property that indicates wich are the filenames (without the extensions) that take place in the generation. It's a list separated by commas.
- ts.cyclosURL is a property that indicates the base url of the cyclos instance.
- ts.numberOfLastCasesToGenerate is a property that indicates what number of last cases the generation will gather.
 e.g:
 ts.execution=PaymentsTestSuite, POSTestSuite, MemberTestSuite
 ts.cyclosURL=http://localhost:8080/cyclos/
 ts.numberOfLastCasesToGenerate=2
In the above example, there should exist three spreadsheets with some tests in each. Only the last two test cases will be generated for each spreadsheet.
The spreadsheet
The spreadsheet contains a macro, so a dialog message appears when the spreadsheet is opened asking if you want to enable macros. Please select “yes”. If no message appears probably the macro will be disabled and you won't be able to generate the properties file. To change this settings go to Tools > Options... > OpenOffice.org | Security | Macro Security button and select the Medium security level. Then try opening the spreadsheet again.
Two main sheets are in the spreadsheet: Input and Configurations. Configuration contains general properties for all the tests we will be specifying in the Input sheet.
The Configuration sheet
Here you can specify general configurations for all the test cases.
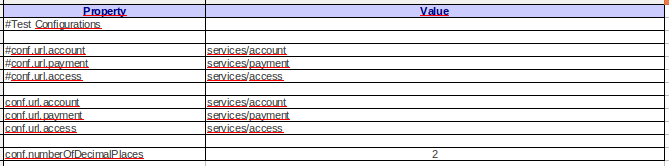
Comments
Comments can be added by adding a “#” character behind the name of the property in the appropriate row of the Property column. In the above example only three interface URLs are defined, the first group of URLs will be not taken into account since the “#” prefix precedes the property names.
Interfaces or WSDL URL properties
In the figure 1 we declare some WSDL URL properties. This properties follow a specific syntax. The WSDL URL property name consists on three sections separated by a dot “.”: “conf” meaning its a configuration property “url” meaning its an URL property wsdl definition name
The wsdl definition name can be taken from the wsdl definition.
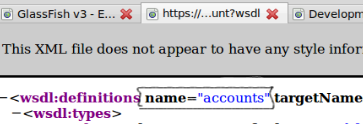
The value of the property consists on the relative URL of the WSDL.
Number of decimal places property
This property declares the decimal places when formatting a number. See Format References for more on formatting numbers.
The Input sheet
Generating the property file
To generate the properties file (the final input file for SoapUI) click on the button Generate Properties in the toolbars section. The number of test cases that will be generated is established in the generator.properties file described before, if this property is omitted all test cases form the sheet will be generated.

General terms
We will go through an example to understand all the concepts. But first we'll introduce some terms.
- Operations
An interface or WSDL may contain several operations. For example, the payments interface has the doPayment and the reverse operations.
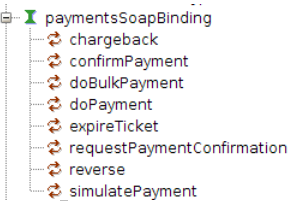
- Input parameters
An operation can have multiple input parameters. For example, the doPayment operation has amount currency description etc... So whenever an operation is invoked (a request is done), all the input parameters of the request must have the appropriate values.
This kind of parameters are declared in the Input sheet using an “in” prefix as we'll see further on.
- Output parameters
The result of a request operation is a response. The response comes with certain data on certain fields. The values of this fields are what we want to hold in output parameters. For example, the field status on the response of a doPayment tell us if the operation has succeeded or not. If we would like to store this value we need to declare an out parameter in the Input sheet.
This kind of parameters are declared in the Input sheet using an “out” prefix as we'll see further on.
- Authentication parameters
Operations needs to carry authentication information on the request headers. This kind of parameters are declared in the Input sheet using an “auth” prefix.
- Assertion parameters
When the response is received, validation stuff can be done. There are different kinds of validations: Validate there is a response from the server. Validate that the response is in the format (xml) that we expect. Validate that in the response doesn't come a soap fault message. Validate that the response contains certain data (e.g: a SUCCESS text in the status field).
The first two validations are done without having to explicitly declare them in the Input sheet but the last ones needs to be specified because it depends on the test context.
This kind of parameters are declared in the Input sheet using the rude “ass” prefix as we'll see further on.
Parameter conventions
Lets look at an example to understand how to specify the above parameters in the Input sheet. Suppose our first test case consists on making a payment. An user member2 wants to pay to member1 1 dollar.
We will specify some parameters for the doPayment operation in the Input sheet.
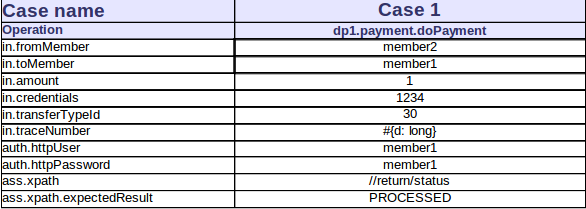
Some parameter values will be explained in the next sections, don't worry if you don't understand everything by now.
- Operation name prefix in parameter names
Each operation must have a unique name that identifies the operation. In the above case, dp1 is the operation identifier.
- auth parameters
When a Cyclos web service client is configure to use http credentials, the operation request must carry this credentials. To accomplish this, authentication parameters must be specified for the request. In this case, the web service client's user and password are 'member1'.
The parameter type is “auth” because it's an authentication parameter.
   The syntax for auth parameters is:
       auth.httpUser
       auth.httpPassword
The values are taken from the sheet and placed encrypted in the header of the operation request.
- in parameters
The values of the input parameters are placed in the operation request.
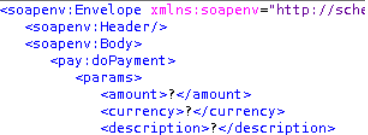
   To specify input parameters the syntax is:
       in.<Name of the parameter>
   where <Name of the parameter> is the exact name of the request parameter. If an invalid parameter name is specified the SoapUI will detect the problem.
Sometimes the requests have multiple section parameters as in doBulkPayment. In this operation you can specify more than one section of params. So we could have something like this:
       <params>
               <amount></amount>
               ...
       </params>
       <params>
               <amount></amount>
               ...
       </params>
To refere to the second field amount you need to be more specific in the naming of the parameters.
   The general syntax for in parameters is:
       in.<tag1[X1]>.<>...<>.<tagN[Xn]>.<Name of the parameter>
   e.g:
       in.params[2].amount to refere to the second amount parameter.
   The parser looks for the following xpath in the request: //params[2]/amount.
   This aplies to all in parameters.
- out parameters
The out parameters are used to hold values from responses and that can potentially be used for filling input parameters or storing important information to be processed later.
Unlike the in parameters, out parameters have an arbitrary name.
   The syntax for out parameters is:
       out.<Name of the parameter>
   A name example:
       out.myOutParameter
   The value of the property is the xpath of the tag from where to take the value to fill the property. The xpath is specified between “#{xpath: ” and “}” like in the following example:
   A value example:
       #{xpath: //transfer/id}
- ass parameters
The ass parameters are used to make validations over an operation response. Following the example described above, we would like to halt the test if we find that the response is a soap fault or if the status code isn't “PROCESSED”.
   The syntaxes for ass parameters are:
       ass.notSoapFaultAssertion If the value is true, then a response will be valid if the response isn't a soap fault.
       ass.xpath
       ass.xpath.expectedResult
This two properties are combined and the above one doesn't have to be necessarily an xpath expression but can be a whole complex expression. Let's describe some examples:
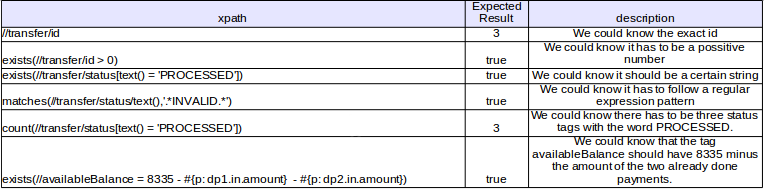
The last row of the above examples shows how we can make references to other properties. For more information on xpath assertions follow this link: http://www.soapui.org/Functional-Testing/xpath-and-xquery-assertions.html
General notes on parameters
- NULL value in properties
If we specify the NULL value for a parameter, then: if it is an in parameter, the tag in the request will be removed. If it is an auth parameter, the Authentication header will be removed. If it is an out parameter, then the parameter will not be created for that case.
- Parameter references #{p: <content>}
In all property values we can make references to other property values. For example, we could reference the trace number property of the doPayment operation in the reverse operation. The r.in.traceNumber property should contain the value: #{p: dp.in.traceNumber} #{p: <content>} indicates that the content should be a property name and it's replaced by the value of the specified property.
- Script references #{s: <content>}
After evaluating in references, script references are evaluated. Script references are available to compute math expressions or whatever groovy script you may want. Example: To test the credit limit, we could ask for the available credit and make a payment of that amount plus one cent. The system should return a credit exceeded message. So dp.in.amount property should contain the value: #{s: 0.01 + #{p: sah.out.availableBalance}} #{s: <content>} indicates that the content should be evaluated as a groovy script.
sah.out.availableBalance has the available balance amount returned by the search account history operation invoked before.
- Format references #{f: <content>}
Sometimes we need to format a number with a certain amount of decimal places. For this purpose we can use the format reference like in the following example: #{f: #{p: sah.out.availableBalance}} if sah.out.availableBalance contain 0.0466 and the declared decimal places is 2, then the result will be 0.05. The decimal places for the format reference needs to be declared in the configuration sheet in the conf.numberOfDecimalPlaces property. #{f: <content>} indicates that the content is numeric and should be formatted following the conf.numberOfDecimalPlaces property.
- Date references #{d: long}
Sometimes we need a generated unique number. For example, if a test case registers Member 1 with username member1, the first time the test will succeed, but in the followings the member will be already registered and the test case will fail if the test case asserts always the status "Member registered". The test case must be smarter and register a new member each time it runs. To accomplish this, the username could be an incremental number computed each time. This incremental number can be obtained with a Date reference. There are many created tests that use this approach. Check them to see how this is easily done.
Running tests
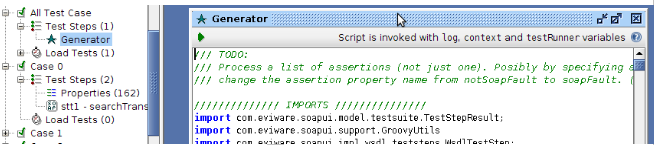
To run the tests, open the Generator step and click on the green arrow button at the upper left corner of the window.
How generation works
There is a test suite generator called 'TS - Generator Test Suite'. This is a special test suite that generates and executes the rest of the test suites. To run this test suite (and generate and run the rest of the test suites) double click the test suite and click on the green arrow button at the upper left corner. For each test suite name declared in the generator.properties file, a test suite is generated.
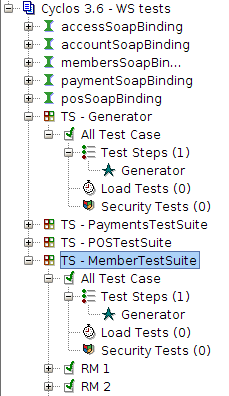
If you want to generate and run a particular test suite, just run the test suite. If you want to run a particular test case, just run the test case.
Test steps are run in descending order, so in the above example the first step to execute is the Generator step and then the first SOAP step below the properties step (properties steps cannot be executed).
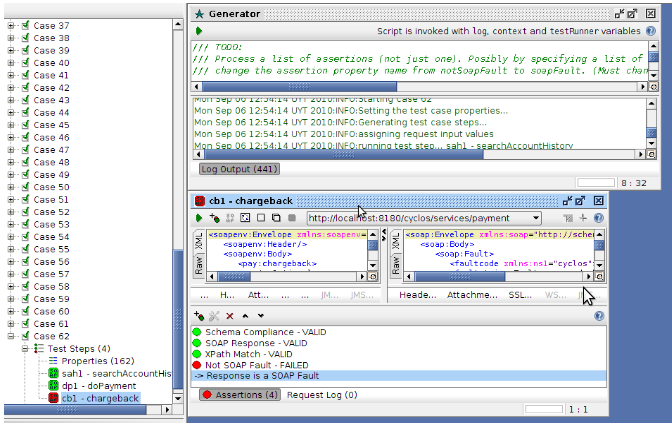
After running the Generator test step, a test case is created for each column specified in the Input sheet. There is also a test step request for each specified operation and a properties step with all the properties for that particular test case. The generator test step window has an output log where we can read the messages of the overall run. The test steps start in white colour indicating that the step didn't run yet. When the step is run it turns to green if there where no errors or red otherwise. To see the request and the response of a step just double click on the step and a window (like the above in the image) will show up. You can double click on the assertions to know it's content.